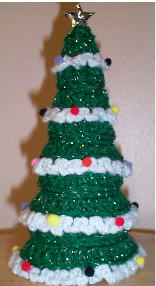
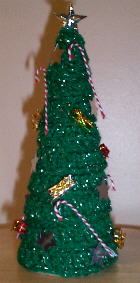
Crocheted Christmas Tree Pattern – With Garland
Directions for making a Cone Christmas Tree – with and without garland. Fits over a styrofoam cone.
MATERIALS: Size I hook; green yarn, stryofoam or cardboard cone approximately 7” tall with a 2 ¾” diameter on the bottom.
OPTIONAL MATERIALS: Decorations for finished tree; white or red yarn for “garland”.
NOTE: This pattern can be adapted to any size cone you want to use since it is NOT crocheted in one piece but each row is separate. See VARIATIONS below to see how to do this. The directions given here will fit the size cone I indicated above.
DIRECTIONS:
NOTE: This tree is created from the bottom up.
Section 1: With green, ch 30. Dc in the 4th chain from the hook, and each ch across. Join to top of beg ch-3 and sl st together down the side so that you have a “band” that will fit on the cone, end off. (Band will be 28 dc around)
NOTE: For each of the remaining sections of the tree, the directions are the same as for Section 1 except the number of beg chs and size of the band will decrease each time. For each section, I have given the number of beg chs and the number of dc in each band.
Section 2: Ch 28 (26 dc)
Section 3: Ch 26 (24 dc)
Section 4: Ch 24 (22 dc)
Section 5: Ch 22 (20 dc)
Section 6: Ch 18 (16 dc)
Section 7: Ch 14 (12 dc)
Section 8: Ch 12 (10 dc)
NOTE: Section 9 does not follow the pattern above. When completed, section 9 will fit over the top of the cone.
Section 9:
Round 1: Ch 2, make 4 sc in 2nd ch from the hook, join in beginning sc. (4 sc)
Round 2: Ch 3 (counts as 1st dc), dc in same sc, 2 dc in each sc around. (8 dc).
Round 3: Ch 3 (counts as 1st dc), dc in each dc around, end off. (8 dc)
FINISHING: Hide all threads. Slide each band of the tree down the cone starting with the first section. Glue section 9 to the top of the tree so that it will not fall off and also keep the other sections from moving. Fit each section so that you can’t see the cone underneath. Decorate with small beads, pom poms, bows, bells, or other decorations. Top with a star or small ornament ball. If the bands seem to slide around on the cone, put a dab of glue on each side of the band to secure it in place.
VARIATIONS:
Before putting the sections on to the cone, add “garland” to sections 1, 3, 5, 7, and 9 using the following directions.
Garland: Join white (or other “xmas” color) into an st. Ch 3, sl st in same st, * sl st in to next st, ch 3, sl st in to same st *, repeat * around, end off. Hide all threads. Assemble tree as described above.
TO ADAPT PATTERN TO OTHER SIZE CONES:
Step 1: Measure about ¾” up from the bottom of the cone.
Step 2: Make a chain that will fit around the cone at that ¾” mark (without stretching the chain).
Step 3: Add 2 more chains and then follow directions as given above (dc in 4th ch from hook, dc across, join ends together to make a band). Make sure the band fits snugly but not so snugly that it slides up the cone. You may have to experiment a little to get the right fit.
Repeat steps 1-3 measuring up from the last section you worked. Repeat until you are near the top of the tree. Then, follow the directions for section 9 above to form the part of the tree that will fit over the top.