Gingerbread House General Construction Plan
Step 1:
 Foundation… the base should be plywood or heavy cardboard to the size and shape desired. Cover with aluminum foil or wax paper and tape together on bottom. Frost or ice the entire base or only where the walls of the house will contact it.
Step 2:
Decorate… except for the roof, most decorative icing should be applied before putting the house together. It is easier to make straight lines or fancy icing on the gingerbread when it is laying flat than on an assembled house when the walls are vertical. So, ice first and allow plenty of time for the icing to dry before continuing.
Step 3:
Walls… Start with the largest walls of the house and pipe a generous line of icing along the meeting edges of two walls and press together. Ice the bottom edges of the walls before setting them in place to help secure them to the foundation. Position side walls between front and back pieces to make the front of the house more attractive. Place can goods on either side of the walls to hold them in place while the frosting dries. Run icing along the meeting edges of the next two pieces, press them together, and settle into position, making sure all iced edges fit squarely together. Again, use cans for support. As you press the iced edges together, icing will ooze from the seams. Before the icing dries, run a metal spatula or butter knife along the seams to tidy up. Later, you can pipe an even line or a decorative edging along the seams to hide any unevenness where the walls meet.
Step 4:
Build…chimneys, dormers and bay windows. As the major walls of your gingerbread dries, the smaller structures can be pieced together. When the icing holding them together is dry enough that they can safely be handled, join these structures to the house. Apply icing to all edges that will touch and gently ease into place, holding for a moment or two. Support with cans as needed. Chimneys and dormers will be added once the roof is in place.
Step 5:
Re-ice… After the walls are thoroughly dry (an hour or two to overnight), pipe a line of icing along the seams from the inside. This extra bit of glue helps to make the house more solid. Let it dry again.
Step 6:
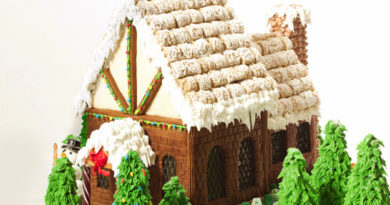
Roof… Ice along the top edges of the walls and edges where the roof pieces will meet. Set one side of the roof in place, then the second. Carefully adjust the two pieces until they meet at the top. Press firmly so that the icing smushes together. Add dormers and chimneys. Be sure to allow the icing plenty of time to dry before adding snow, shingles, reindeers, etc. To secure shingles or roof ornaments, first frost the roof with snow, then gently press the objects into place. If laying shingles (slivered almonds, cereal, fondant, etc.), apply a strip of frosting a little wider than a row of shingles to the bottom of the roofline. Press the singles into place. Then frost the next row up, press the next row of shingles into place so that they overlap the first row a little bit, and continue on until the top of the roof. If shingles don’t match up perfectly at the peak of the roof, cut smaller shingles or camouflage the peak under a blanket of snow.
Step 7:
Finish it!… The finishing touches are as wonderful as your creative imagination lets you… Detailed icing, landscaping, figures, snow and roof decorations are the last things to add to the gingerbread house.
Step 8:
Enjoy…. and enjoy the mistakes because it will cause you to be even more creative than you ever imagined!
by Kimberly Lainson of The Party Works